
One of the things I love about the DevOps movement is how (when done right) it empowers developers to work with infrastructure in a safe and controlled manner. Once you’ve nailed down deployments to a static set of servers (production, staging, etc.), the next level up is allowing developers to create their own test servers. This gives them the ability to easily show off their work to teammates for feedback and testing.
The popular response these days is, “you need Docker/Kubernetes for that”. While Docker is a suitable tool, it’s not necessary for many use cases and often adds more complexity than it removes. In this post, I’ll show you how to do it all with our orchestration tool of choice, Salt.
Pre-Requisites
- The process should be as simple as possible for developers. Ideally, just a single command.
- Creation and tear down should be optimized for speed. Waiting 30 minutes or more is unacceptable.
- Test instances should be isolated, both from production and other test instances.
- Test instances should have parity with other environments (staging, production, etc.). We want to avoid, “it was working on my test instance, but breaks in production” issues.
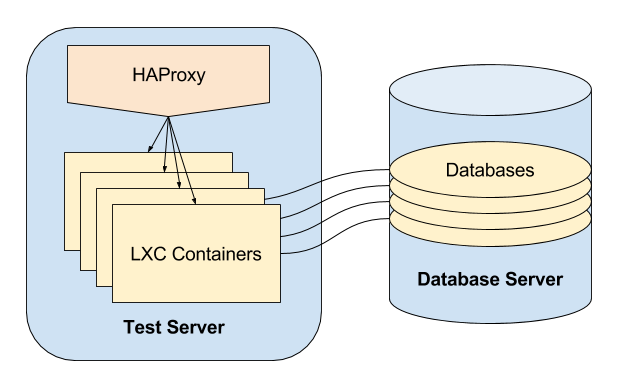
Overview
There’s lots of different ways to slice this up, but you’ll need the following components:
- Traffic Routing This could be via unique client-accessible IPs and DNS or a wildcard DNS entry combined with a proxy that routes to correct instance.
- Application A server or container that runs your application.
- Backing Services Database, cache, etc. These could run in the same place as the application or on additional servers/containers.
- Initial State An application with no data typically isn’t of much value. You’ll need to propogate it with some data. A recent copy of the production data, scrubbed of any personal/private information is ideal.
For our example, we’ll use:
- HAProxy for traffic routing with a wildcard DNS entry that’s used for all our test instances, e.g.
*.test.example.com. - LXC Containers for running the application and any stateless backing services
- A shared database server which houses one database per test instance.
Naming Conventions
With all the different pieces required, good naming conventions can save you when it comes to configuration and troubleshooting. For our example, test servers are unique per branch so we can key everything by the branch name:
- Web address:
https://{branch}.test.example.com - Database name:
test_{branch} - Container hostname:
{branch}.test.example.local
But there’s a small issue with this approach. Branches may have characters that are not valid in some of these use cases. For example, underscores aren’t valid domain names. You’ll need to replace these invalid characters (my_branch becomes my-branch) and may even want to implement special routing/redirects for convenience.
Implementation in Salt
Our implementation will span multiple servers and services. This is the sort of thing that Salt’s Orchestrate Runner was built for. We’ll write an SLS file for the runner so we can create a test instance and all its services simply by running:
$ salt-run state.orchestrate \
           orchestration.create_test_instance \
           pillar='{"name": "my-branch.test.example.local"}'
Tip: Use some remote execution wrapper like Fabric or even ChatOps to provide a interface so developers can do create_test_server my-branch instead of remembering the error-prone incantation above.
We’re passing two arguments to the state.orchestrate runner:
- The name of the SLS file which defines the steps to run in dotted notation. In this case, we’ll be using
orchestration/create_test_instance.sls. That’s a relative path from Salt’s file root (by default/srv/salt). - A JSON formatted dictionary which contains the name of the test instance we want to create. This is passed in as a Salt Pillar.
The SLS File
The SLS file for the orchestrator will glue together all the different parts of the system. Some call out to other states defined in Salt, but to avoid getting mired in the details, I won’t be diving that deep into the stack in this post. I’ll assemble the SLS file step-by-step below with comments. Here is create_test_instance.sls in its entirety.
-
Extract the branch name from the pillar
We’ll reuse this in a lot of the states that follow.@syntax: jinja {% set branch = pillar.name.split('.', 1)[0] %} -
Create the database
We’ll need the database ready prior to setting up the application. This runs a custom state namedcreate_test_db. It runs on the Salt Master because we are using RDS which is not accessible as a minion. Thecreate_test_dbstate will create a unique database for the app to use.
Tip: Creating the database from a pre-existing template database can really speed up the process with larger databases.@syntax: yaml {{ branch }} db: salt.function: - name: state.apply - tgt: salt.example.local - arg: - projects.test.dbs.generate_from_template - kwarg: pillar: db_name: {{ branch }} -
Create the application instance
Here we use Salt Cloud to spin up a new LXC container. This also runs from the Salt master.@syntax: yaml {{ pillar.name }}: salt.function: - name: cloud.profile - tgt: salt.es.local - kwarg: profile: lxc_test names: - {{ pillar.name }} config_dir: /etc/salt -
Verify the new instance
This step isn’t totally necessary, but it provides a sanity check that Salt Cloud did its thing properly.@syntax: yaml {{ pillar.name }} up: salt.function: - name: test.ping - tgt: {{ pillar.name }} -
Limit memory usage of the new instance Test servers aren’t meant for production-level code, so it’s not rare to see a poorly written script get executed that exhausts all the RAM and takes down the test server. The soft limit will limit test servers to 3 GB of RAM if it becomes scarce. This is executed on the LXC host.
@syntax: yaml limit {{ pillar.name }} memory: salt.function: - tgt: test.es.local - name: lxc.set_parameter - arg: - {{ pillar.name }} - memory.soft_limit_in_bytes - 3G -
Create a DNS entry for the new instance
We have a custom script which will lookup the instance’s IP address (via thenetwork.ip_addrsSalt module) and publish it to DNS. In our case this script uses the AWS API to update a Route53 hosted zone.@syntax: yaml {{ pillar.name }} DNS: salt.function: - tgt: salt.es.local - name: cmd.run - arg: - /usr/local/sbin/update-internal-dns {{ pillar.name }} - require: - salt: {{ pillar.name }} up -
Update the grains on the new instance
Salt Grains are used to define the branch that should be deployed to the instance. This is executed on the new instance.@syntax: yaml {{ pillar.name }} grains: salt.function: - tgt: {{ pillar.name }} - name: grains.set - arg: - branch - {{ branch }} - require: - salt: {{ pillar.name }} up -
Configure the new instance and deploy the application This is all done via a Salt highstate on the new instance. The beauty of this is that it uses the exact same deployment steps as every other environment
@syntax: yaml {{ pillar.name }} highstate: salt.state: - tgt: {{ pillar.name }} - highstate: True - require: - salt: {{ pillar.name }} grains ``` 9. Update the proxy server to route to the new instance Our LXC host which houses the test instances runs HAProxy to route web traffic to the right container. This uses two SLS files. One to install HAProxy and another to configure it to route to each individual container.
```
@syntax: yaml /etc/haproxy/haproxy.cfg: salt.state: - tgt: test.example.local - sls: - packages.haproxy - test.haproxy_config - require: - salt: {{ pillar.name }} up - {{ pillar.name }} DNS ```
Wrapping Up
This was my first time using Salt’s orchestration functionality and I have to say, I’m impressed. It allows you to take a very complex process like we have here and break it down into small logical blocks. While it’s a decent amount of effort to get the custom states working just right, most of it is just reused from our standard deployment. It’s very simple to assemble and execute everything.
There’s a lot I’m glossing over here, if you have questions, or would like to see anything else more in-depth, leave a note in the comments.